Credits

I’m trying to spread out the non-project posts, but it’s time to give some credit to the software that makes all this possible. I’m an open-source kind of gal, but as someone who only barely programs, the contributions I can make are limited. I do hope to eventually create some tutorials, but for now I will settle for proclaiming my use of them to the world.

WordPress is the obvious starting point, a beautiful content management system that is infinitely customizable. My theme is a slight modification of the included theme Twenty Twelve, called ReveDreamsSpecial. It is a child theme, but barely so, since it changes the header but otherwise only changes the CSS, which I could do to Twenty Twelve directly. Should I ever want a dramatically different-looking custom-designed webpage, I could keep WordPress as the basis, because it is built for such flexibility in the presentation of content.

Along with WordPress I use WooCommerce for my shop. Technically this is a plug-in, but it’s so extensive it doesn’t feel like it should have that designation. However, its plug-in status means it integrates seamlessly with WordPress, including in the sidebar and menu contents. There are additional plug-ins for free or pay that extend WooCommerce with various payment gateways, customer interface functionality, ability to sell subscriptions, etc.

In the background I have three programs used for working on images and pdfs. Scribus sees the most use; it is a page layout (desktop publishing) program. I use it to make my pattern pdfs. It allows me to put text boxes and image boxes wherever I want them while maintaining alignment of text baselines and so forth, can input vector graphics, and has (very) basic image editing abilities and shape-drawing options. I can set up a whole template of margins and guidelines, and tweak positions and measurements down to the fourth decimal place in a variety of units of measurement. It can be crabby sometimes, but I love that it does not require Mac’s X11 program to operate.

The remaining two do require X11: Gimp and Inkscape. Gimp is well known photo editing software that I used to clean out the gray behind Stumpy in my header image. I don’t use it too often (typically I am at the depths of the editing I know how to do with iPhoto’s options), but it is my go-to when I want to make a photo collage or similar. My most recently acquired Gimp skill was how to make an animated gif.

Inkscape is a vector graphics program, and in it I made my logo, as well as a graphic of stork-shaped embroidery scissors and some embroidery stitch diagrams. I haven’t quite grasped all the uses of vector graphics, I think, but I feel good having grasped the basics of creating them.

This page would be incomplete if I omitted some non-open source components. I mentioned iPhoto, and I am also a big fan of TextEdit and Preview on my Mac. I must admit I’ve been considering buying Pixelmator to replace both Gimp and Inkscape with a Mac-native program, especially next time I want to make stitch-instruction diagrams. The script letters in my logo are Janda Elegant Handwriting by Kimberly Geswein, and the title and byline text are Rotis Semi-Serif, which is also the font used in my patterns. I’m a fickle web-browser user despite the annoyance involved in switching from one to another, but currently use Firefox.
Reviving

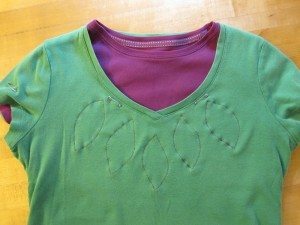
I live in t-shirts all year round, the nicer kind, typically with v-necks or scoop necks. They last me a long time, but sometimes I lose the desire to wear them well before they are actually worn out. When that happens I have two choices: give them away, or try to alter them somehow. After talking to an alterations student who happened also to be a Sew-Op teacher, I decided to remake the most recent batch: two shirts that were faded and floppy, and one that was too high in the neck and hem and had a tiny bleach spot. Here’s the first result.

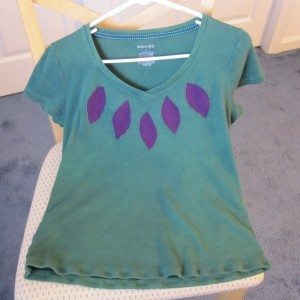
leaves dyed

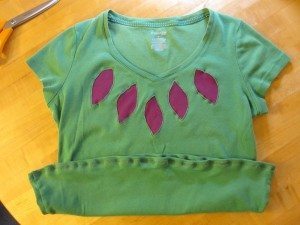
I combined the high-necked shirt with one of the floppy ones to try out reverse applique a la Hope Studios, though I did not plan to retain both full t-shirts. First I put them both on and lined them up so any parts that have stretched with time to accommodate my shape matched. Then I freehanded some leaf shapes at the neckline and pinned there. I used a narrow zigzag to sew around the outside of the leaves, with the thread tension turned up and the presser foot tension turned down in an effort to avoid stretching out the fabric. I cut away the excess fabric of the inner t-shirt, leaving the leaves connected and a decent amount at the bottom so I could smooth it out and avoid it being obvious from the outside that there was an extra layer ending at a random spot. Only after that did I clip out the insides of the leaves on the top layer, using small pointed-tip scissors. My advice to anyone who wants to do this is: go slowly. If you nick the bottom layer there’s not much you can do about it.

shirts pinned leaves stitched

The top layer had a pinhole just above the hem stitching at center front, and to secure that as well as help with some of the floppy feeling, I turned the hem to the inside and stitched it up with a wider zigzag. All the stitching was in a thread that approximately matched the inner layer, though far from exact. I knew it didn’t matter too much because of the next step: overdying the whole shebang to harmonize the colors (which does not affect the thread). I gave them a 15 minute bath in a somewhat weak solution of royal blue RIT. I think that step might have been enough by itself to save the green shirt, because I love the finished color (which is richer than the photo at top makes it look).

Before I began the blog, referenced in my post about stitching with a twin needle but with mysteriously disappeared photos, I shortened several shirts, and bleached and re-dyed some others. I was using benzoyl peroxide on my face at the time and it was seemingly never possible to avoid damage to my clothing. I was pleased to realize that was almost three years ago and three of the four shortened shirts are still in rotation; the redyed shirts, however, are all retired. I don’t think I would bleach if I were doing that again. It is too hard on the fabric.

I’ll show you the results of the second project soon – it took a lot longer than anticipated!

Another link in the chain

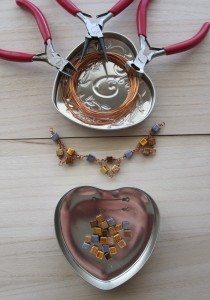
At least five years ago, I took a one-off course in wire wrapping. This is a technique used in jewelry making to make wire loops that are finished in a secure and decorative way: by wrapping one end of the wire around the other. I began a necklace with copper-colored wire and some metallic beads.

cube necklace materials

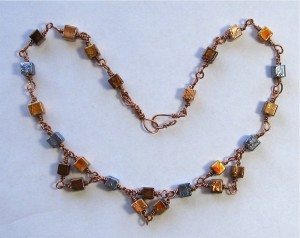
I decided to finish the necklace after all this time to discover that not only did I not remember how to make the wrapped loops, I didn’t remember what the technique was even called. I tried a few practice loops and they really didn’t come out. Fortunately for me, its name is straightforward. I found wonderful instructions on Fusion Beads, from a whole index of wire beading techniques. I had been doing it almost right, with two exceptions: I hadn’t been leaving a long enough “tail” of wire to wrap with, and I had missed the movement of the pliers from under the loop to inside it (step 3 in the instructions linked above). Not long after reading those instructions, I had this:

cube necklace finished

I made up the hook and eye closure since I didn’t have any copper-colored findings. My motivation to start was really just to check it off the list, but I rather like it. I’ll put it with the rest of my underused necklaces!