Wishes won’t wash dishes

Now that I have a second person in the house, dishes get done by someone who is not me (this is a wonderful thing). Because of that, it became a Good Idea for the dishwasher to indicate whether the contents are clean or dirty. Being me, I designed such an indicator from scratch. It’s a cross-stitch square to be applied to a piece of self-adhesive magnet sheet.

magnet clean side up magnet dirty side up

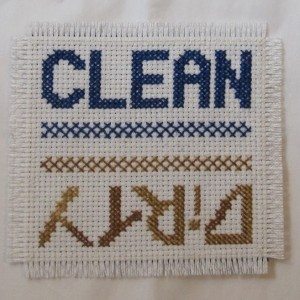
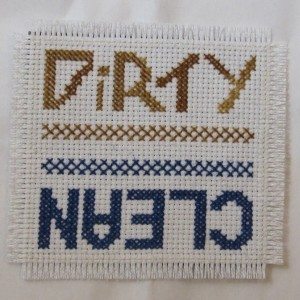
This one isn’t actually ours, it’s one I made for a friend, which is why it looks pristine. The pattern is available as a pdf download. Colors are not included; I used unlabeled floss left over from other projects, and neither of them appears to be DMC (according to my color card).

If you want to make one that looks like the one above, you’ll need a crisp dark blue floss and one that variegates between tan and sand color. Don’t worry about matching up the colors in the variegated side; sudden changes, stitches that are half one color and half another, and pools of one or the other extreme color add to the “dirty” vibe. I used 2 strands on 14 count Aida; you might decide the fuller look of 3 strands would be better.

After stitching the middle, I used a single strand of white floss to secure the edging inside the fringe (which had yet to be cut) with a neat whipstitch. I secured each end of each strand in the colored floss of the interior, came out one square away from the image, and went back down two squares outward of that. Repeat in the next square over, so the back of the work shows gently slanted stitches. At the corners, five stitches share an inner corner.

For extra security (our magnet is showing most of its wear in the fringe region), I backstitched across the middle of the whipstitches all the way around and out to the edge of the whipstitch (i.e., the 2nd and 4th whipstitches sharing an inner corner actually share two inner corners, because a second stitch goes from their outer end to the corner of the backstitch line). This thread was also secured in the colored stitching.

To make it easier to remove the magnet from the dishwasher without pulling the fringe out, I wanted to bevel the magnet with my utility knife. However, I realized it was far too thin for that, so I beveled it by rubbing the outer edges on sandpaper. After wiping off the dust, I peeled off the paper backing and pressed it onto the back of the stitching.

Finally, for extra extra security, I taped off the fabric outside the white stitching with masking tape and brushed a thin layer of Mod Podge on the interior. After that dried, I peeled off the tape, trimmed the fabric to 3 rows outside the white stitching, and pulled out the crosswise threads of the fabric outside the white stitching to make fringe.

More gifties

My sister requested a crochet Pi for her office, and since the very few versions I found online (for pay or free) did not excite me, I decided to make my own.

two pis

This is big little pi and little big Pi. I haven’t totally worked out the pattern for big little pi, but here’s the other.

Little Big Pi

Top bar:
1. Sc 6 in magic ring.
2. 2sc around (12).
3-5. Sc around (3 rnds).
6. Ch 3, sk 3 sts, sc 9.
7-8. Ch 3, sk prev chs, sc 9.
9. Sc into each ch and sc of prev rnd, leaving a lp of each ch exposed to sc into later (12).
10-14. Sc around (5 rnds).
15. Sc 2, ch 3, sk 3 sts, sc 7.
16-17. Sc 2, ch 3, sk prev chs, sc 7.
18-20. Rep rnds 9-11.
21. Dec around (6).
Cut, leaving a tail for finishing, and pull end through last stitch, but leave open for now.

Legs:
These are crocheted directly onto the top bar, beginning in rounds 6 and 15 of the top bar. Be warned that it is very easy to add a stitch in rounds 1 and 2 – when you are done with round 1, count to 12 back the way you came to make sure you’re stitching into the correct loops.
1. Place sl kn on hk and sl st to join to middle skipped sc in rnd 6 or 15. Sc in same st and next sc (2), in ends of rows once before, between, and after the chs (3, 5 so far), in each rem lp of the chs of rnd 8 or 17 (3, 8 so far), in ends of rows as before (3, 11 so far), and in rem skipped sc of rnd 6/15 (12).
2-14. Sc around (13 rnds; sk sl st of rnd 1!).
15. Dec around (6).
Stuff and FO. After both legs are done, stuff and FO top bar.

Resolution roundup

Back at the start of the year, I posted a list of crafty resolutions. Let’s see how I did.

  1. Design a new crochet pattern every month, on average.
    Let’s count: purple barn owl, rainbow squid and a friend of his I haven’t shown you yet, the thumbnail hippo, a mutant marshmallow bunny, my winter hat, and four snowflakes, though only one has been posted. That makes 6 posted, 10 total, though it occurs to me I’ve omitted at least one that hasn’t been blogged yet. However, I also made a lot of patterns for my crochet class; definitely enough to bring me up to 12 even if we’re stingy with which ones count.
  2. Try a craft I’ve never done before. Possibilities include soapmaking (the right way), candlemaking, quilling, wood carving, macrame, needle felting, Chinese knotting, tatting, and throwing pottery on the wheel.
    I did soapmaking a “righter” way, but I also made a flexagon, so I’m calling this good.
  3. Finish two more pieces for my Children’s Book Quilt.
    Last one of 2011 was Lowly Worm, completed on New Year’s Eve. In 2012 I made Harold and One Fish, for success on this resolution!
  4. Make my summer hat, before it is in season.
    Ha ha ha ha ha!
  5. Finish my Fibonacci-themed wall quilt pattern.
    Likewise, this did not happen.
  6. Make a clothing pattern template for myself, following the directions in How To Make Sewing Patterns.
    Nor this. I don’t make clothes for myself from scratch very often, so it just wasn’t a high priority.
  7. Take better and more creative pictures of my finished projects. This is complicated by the fact that I live in northern New England, where (especially in the winter, but to some extent in the summer) natural light is in short supply even during the day.
    This I think I succeeded in, especially in the light aspect. I am still working on it, though!

Four out of seven… well, could be better but I’m not too disappointed. Now it’s time for the next batch of resolutions!

  1. Take all my crafting photos either in natural light or in the photo tent I constructed this weekend out of a cardboard box.
  2. Design at least twelve crochet patterns.
  3. Design at least four embroidery patterns (any kind of embroidery; most likely to be cross-stitch).
  4. Get my crochet class materials into shape for a self-study course.
  5. Write and teach an amigurumi class.
  6. Try another crochet pattern and an embroidery design out of my Japanese crafting books.
  7. Stitch an embroidery art piece of my own design.
  8. Do some writing exercises: at least the first 5 chapters of Writing the Natural Way, which a lovely friend bought for me for Christmas.

The photo resolution will not be realized instantly, as I have some photos taken prior to the weekend and not yet blogged, but it should be a mainstay by the end of the month. I’ll blog the box itself, too, once I have used it a few times.

Number 7 will be a first. Although I’ve made art embroidery pieces before, my spaceman was from a book cover and Saturation was not designed, per se. I have some ideas, but I’ll have to prioritize it to get it done this year.

The last one, though, is my real stretch resolution. Although I think I communicate well, I do not consider myself a writer. Opinion pieces, technical writing, expository work – those things I can do, but fiction and persuasive writing are a lot more difficult for me. I’m hoping that not only will my blog posts improve, but my crochet design will too. I want to design lots of monsters and other unreal creatures, which means they have to come out of my brain, not out of nature. I put the book on my Amazon wishlist because a landscape quilter said she had always made attractive quilts, but they didn’t tell a story, and after working through this book her quilts tell a story and are much improved. I figure half a chapter a month, with some pad time, is a reasonable amount. If I really take to it, I may get through the whole book!

Happy New Year!