Number one in gauge

As I work on my crochet self-study program, I find many topics I want to investigate. One of those is gauge. I make virtually no items that are gauge-dependent; as long as my stitching is tight enough to hold stuffing and consistent enough to keep the pieces-parts of an amigurumi proportional, it doesn’t matter how big it is.

A couple of examples for the course’s page on tension and gauge expanded into six swatches, every combination of two yarns and three hooks. The results were unexpected, to say nothing of the information on the ball bands. Without further ado, though, the swatches themselves:

six swatches

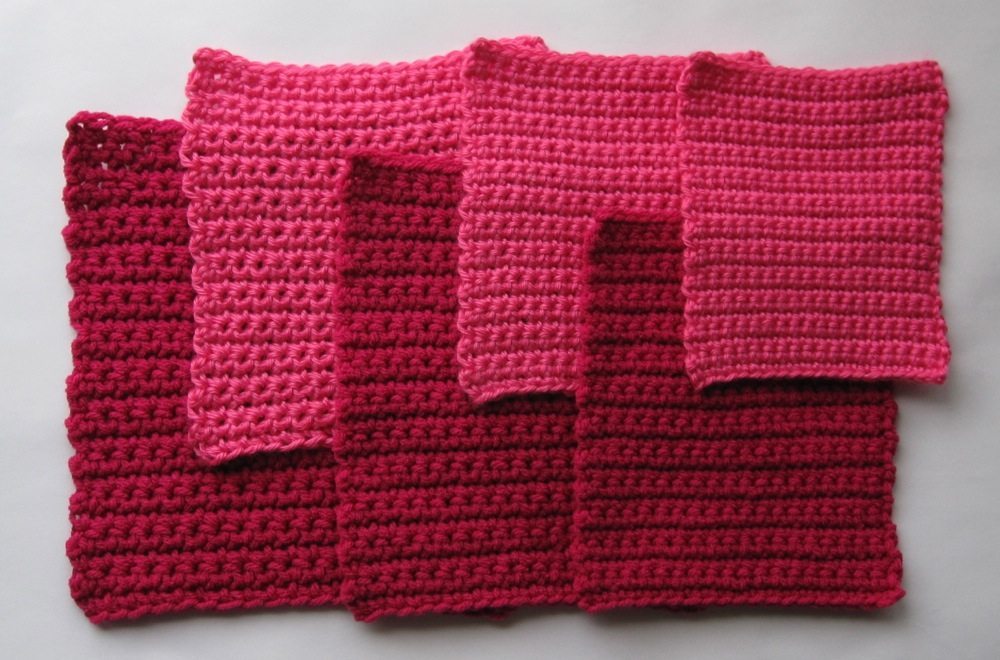
The brighter, lighter pink, in smaller swatches overall, is Caron Simply Soft. The darker pink, larger swatches are Red Heart With Love. I chose these yarns because they are both 100% acrylic and in yarn weight classification 4-Medium, but are otherwise as different as they can be. As you can see below, With Love is visibly thicker; it is also slightly fuzzy, almost chenille-like, and the strands are more cohesive. Simply Soft is almost slick in its smoothness and has a tendency to split.

skein comparison

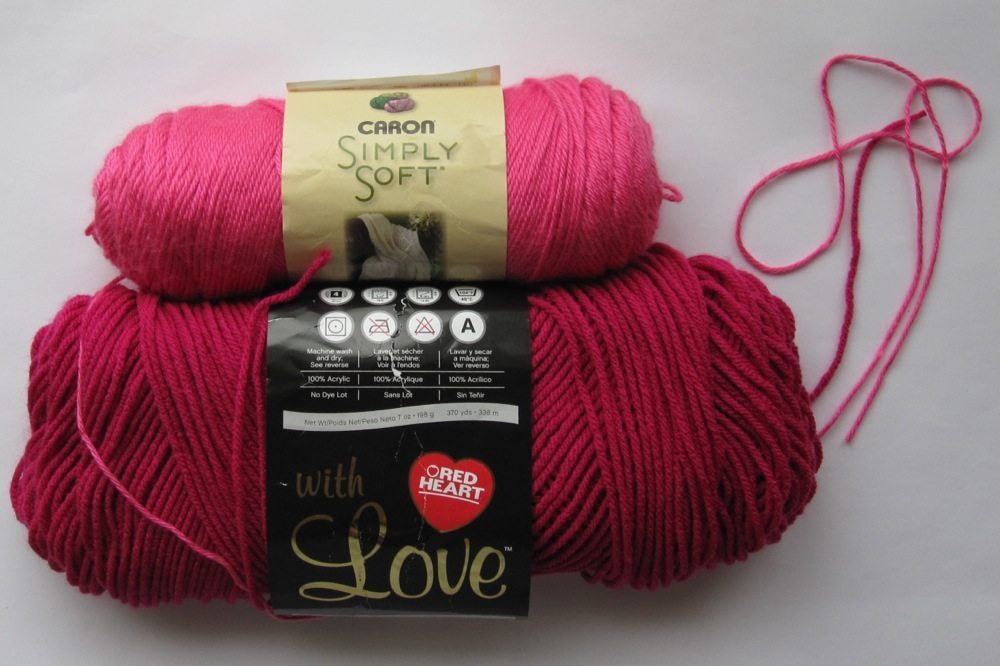
To find out to what degree my impression of thickness reflected objective reality, I calculated the WPI (wraps per inch; basically the number of parallel strands that can be lined up within an inch) of each yarn. I don’t have a lot of confidence that I was doing it completely correctly, but I measured a WPI of 8 for With Love and 10 for Simply Soft. That’s a significant difference! According to Ravelry, both should have WPIs of 8, though that makes me think the WPI was not actually calculated for each, but just assigned according to weight class. Which makes it not so useful.

I did not expect to be anywhere close to the gauge on the yarn label (ball band). I know PlanetJune discovered one yarn brand where a recent skein had yarn that was measurably thinner than an older skein’s contents, but the ball band’s gauge information was unchanged. That led me to be suspect of all of them, in addition to my experience being very different from stated gauges in the past. Before starting the swatches, my theory had been that for yarn substitutions, yards per ounce would be a better comparison point than the gauge on the label. However, I discovered something totally counterintuitive: Simply Soft gives you slightly fewer yards per ounce than With Love. That is, Simply Soft is enough denser than With Love that despite being so much thinner, if you weigh equal lengths of each kind of yarn Simply Soft will be a bit heavier. So that theory went out the window.

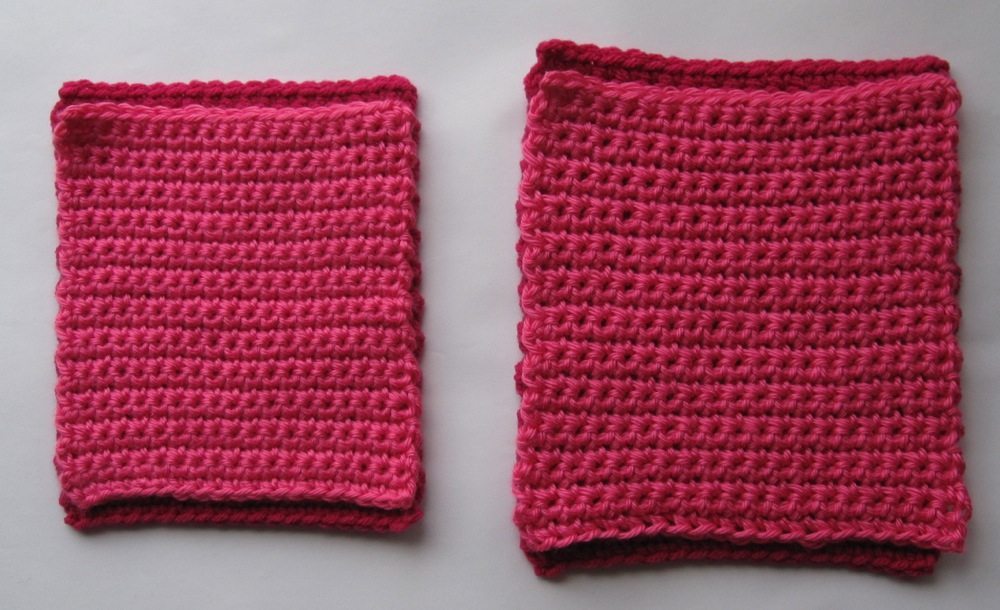
The swatches above were made with F (3.75mm), H (5mm), and K (6.5mm) hooks, chaining 20 and single crocheting 25 rows. The hooks were chosen because F is a typical amigurumi hook for me, H was recommended on the Simply Soft label, and K was recommended on the With Love label.

And now, the gauges:

sc per 4″ (10cm) rows per 4″ (10cm)
Simply Soft F 16 18.7
With Love F 13.3 14.5
Simply Soft H 14 17
With Love H 11.2 12.8
Simply Soft K 11.4 14.5
With Love K 9.6 11.8

A few observations: for me, same-width single crochets in thinner yarn are shorter than those in thicker yarn. The middle four rows of the table make it look like a 1.5mm change in hook size about accounts for the yarn in terms of stitch width (the difference between H and K; F and H are only 1.25mm apart, though there is no guarantee moving down to E/3.5mm wouldn’t overcompensate), pictured below. If I were to take a pattern for With Love and want to make a more open, drapier version of it with Simply Soft, my first move would be to go up 1.5mm in hook size, and then try using extended single crochet to increase the height, though perhaps only every other row.

like-width swatches

Rather to my surprise, my stitches were larger than the label gauge. The With Love label said that using a K hook there should be 14 stitches and 14 rows to obtain a 4″ square. I only needed about 10 and 12, respectively. My F hook swatch was much closer than my K hook swatch! The gauge for Simply Soft with an H hook was 18 stitches and 24 rows, whereas I only needed 14 and 17. Even my F hook swatch was too large.

More investigation is needed. In particular, I’d like to know whether I’m always larger than the label gauge, and whether it’s by a consistent amount (proportion). There is always something to learn.

How to teach embroidery

The title is misleading – “how to teach embroidery” is more of a question than an answer. I’ve taught it multiple times at the Sew-Op and the students seem satisfied, so perhaps I’ve succeeded already, but it’s such an odd, free-form class that I can’t really tell.

I’ve got another session of embroidery class tonight, so I’ve been thinking about this question over the past couple of weeks. Should I make it a project class? In December I taught one aimed at making felt ornaments, with a variety of holiday and non-holiday patterns printed on tracing paper. No one used any; they were all interested in embroidery for their own purposes.

Still, it’s nice to have something to hang up in the store to entice people to sign up. That didn’t happen, but I do have a few of the new models I wanted. In the last five or six days I’ve remembered several I would have liked last time, but didn’t note down for myself in any place I’ve looked at since.

new demos
You’ll see these apples again.

I have learned some things in the few times I’ve taught embroidery. One was how to successfully make a French knot! No longer are they the bane of my cross-stitching experience. I’ve also had to learn to be flexible in how I describe stitches. I may do well describing the blanket stitch in terms of compass directions or the corners of a box, but that doesn’t mean everyone will. I even had one student who was the most kinesthetic learner I’ve ever met, and the only thing that worked was actually placing the needle for her and having her complete the motion, all the way through the stitch. After that she had it, but description and demonstration did not suffice.

I try to emphasize how much can be done with just a few stitches, bringing a pile of examples to class. The embroideries for my children’s book quilt are almost entirely straight and satin stitches, with a few backstitched or stem-stitched portions (none of which are vital to the look). I have an antique handkerchief done in satin and straight stitch, and a tea towel with lovely flowers and butterflies made from lazy daisy, blanket stitch, stem stitch, and French knot. The examples I hope to have before the next time are more thorough but also modular: different numbers of strands, perle cotton and other non-embroidery-floss materials, quilting cotton versus more coarsely-woven fabrics, stitching in different sizes and with different proportions. Ideally I’ll eventually have a personal stitch sampler with a page for each stitch and for different thread/fabric combinations that can have its pages taken out and passed around.

Since there are only so many stitches we can cover in two hours, I try to emphasize the motions that distinguish the categories of stitches and are common to multiple stitches. Are you overlapping? Catching a strand? Pointing your needle in the same direction as the stitch line is progressing, off by ninety degrees, or backwards? My handout covers lots of embroidery basics, tips, and advanced notes they may come back to later, as well as ten stitches with variations. We don’t come close to covering all of them, but having them in the handout allows me to tailor the class to the interests of the participants. We always start simply with running stitch and general thread management, but then: If they are interested in classic stitching like my tea towel, we’ll cover stem stitch, French knot, chain stitch, and blanket stitch, probably in that order. If they are interested in making pictures more like my children’s book embroideries, we’ll work on the various straight stitches and doodle in thread. If they want to put edgings on blankets and garments, we’ll cover whipstitch, blanket stitch, and cross-stitch, and I might ad lib herringbone stitch.

Doing is the most important part of any class in arts and crafts, though. Doing anything! If I can teach them the basic motions and how to think about embroidery stitches, it doesn’t much matter which particular stitches we cover because they’ll be equipped to learn others on their own.

Maybe I had more answers than I thought…

Reviving, part 2

In part 1, I showed you the result of combining two of my three worn shirts into one reverse-appliqued shirt. There was one left, and I planned to combine it with a secondhand white shirt and overdye again, but I didn’t want to completely repeat myself. Ultimately I had this:

front of finished bird shirt back of finished bird shirt

This took longer both because there were more steps and because I didn’t buckle down with it like I did with the green shirt. The white shirt was a men’s XL and huge, so before beginning I cut a panel out of the front so that I would leave a usable amount of the material in its original state. I thought the birds would be more interesting if they weren’t solid red on a red-orange background, so I tried out a Tulip tie-dyeing kit. After accordion folding and rubber-banding the fabric, and then folding it in thirds and rubber-banding again, I put it in a plastic bag, sprinkled dye powder on it, and wet it thoroughly with a spray bottle. This was to preserve the leftover dye powder for later use, as the box warns it loses potency fast, without making the risky maneuver of putting it in a cup and mixing it separately. I could see myself getting dye powder all over the counters. I let it sit for about seven hours and then rinsed it and washed it. Good results! [Incidentally, I tried dyeing elastic as well, and you can see the mixed results there. The one that dyed well was Dritz stretch lace elastic, and the one that barely dyed at all was Stretchrite knit elastic.]

bundled up tie-dyed

I’d wished for a dark red, like RIT’s wine color, but this would have to do. At least it came out well!

After a time I decided to dye it again, bundled it up in a different direction (and with a scrunch rather than accordion folding), folded it in half, rubber banded it three times and threw it in a dilute bath of RIT dark brown. That made it come out even better. I pinned the dyed panel inside the orange shirt, on which I had drawn freehand bird shapes. As with the previous shirt I sewed with higher thread tension and lower presser foot pressure, just outside the drawn lines. Since there was really no obvious color choice for thread, I used yellow, thinking this might help the birds really pop once the whole shirt was overdyed. After stitching, once again, I very carefully cut out the birds.

birds sewn and trimmed

I wanted to do something to the back of the shirt, but decided after trying it on at this point that birds all the way around would be too much. Instead I raised my thread tension a bunch and sewed with a long stitch along a line centered on the back of the shirt at about the level of the tops of the birds’ heads. That gathered the fabric nicely, and then I pinned a length of ribbon along the line on the inside and stitched the fabric to it with a short, narrow zigzag.

Then came a red dye bath, which I did not pay much attention to, and ended up with a very splotchy shirt – almost tie-dyed.

blotchy bird shirt
This is why the RIT bottle says “STIR CONSTANTLY.”

It really wasn’t my cup of tea, especially the strange shade of pink the birds had turned, so I went one more round to get the result at the top of the post. This time it was in the washing machine instead of a bucket, and was a dilute bath of red, orange, and brown that I left the shirt in for a good hour. There was some relief when I pulled it from the wash afterward, though it was unfortunate how much the variegation on the birds had disappeared.

Overdyeing like this, incidentally, is something I learned from reading about graphic design. When choosing a color scheme, for a website for example, one way you can make sure the colors coordinate is to set out your palette and then add a semi-transparent layer of a single color over all of them. The resulting blended colors have more in common with each other. The first time I wore the green shirt a longtime quilter, sensitive to color, commented on how well the colors went together, which told me the technique did indeed translate successfully to dye!