Adventures in Tension

Sewing machine thread tension was never anything I worried about until about the last two years, when suddenly it seemed to become a huge deal. Machines were skipping stitches, thread was breaking, everything seemed haywire.

As implied by the name, tension is tautness of the thread. On most machines there are two or three metal or plastic disks that you run the top thread between when threading the machine. When the presser foot is up they are loose, and when the presser foot is down they are compressed, by an amount determined by the user. There is also a tension setting for the bobbin thread, but setting it requires a screwdriver and is intended to be done only by sewing machine mechanics. Unless something is wrong with the machine, you’ll be able to adjust the stitching as needed using the top thread tension.

Proper tension means the stitch lines look the same on the top and the bottom, with no looseness, looping, skipped stitches, pull-through, or fabric puckering. To set the tension, start with it at its middle value. Load top and bobbin threads of two different colors into your machine and sew a straight stitch at your usual stitch length on a double-layered fabric of a third color. Choose the fabric to be representative of your usual sewing – I set my tension using calico or muslin. If the stitches look taut, the fabric puckers, the thread breaks, or the bobbin thread pulls through the fabric, decrease the tension. If the stitches look loose or the top thread pulls through the fabric, increase the tension (the top thread pulling through is not much of a problem in most situations, though, as long as it’s not creating actual loops on the back).

Here is an image of my sewing machine’s various settings. It is worth noting that 0 tension really is no tension! You can see that the bobbin thread hasn’t even stayed put in that one. I’m not getting puckering, but the stitch seems to be shorter on higher tension.
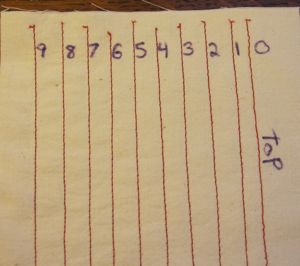
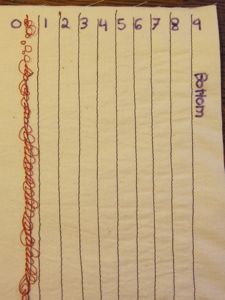
tension spectrum tension spectrum

More information is obtained if you stitch on the bias instead of with the grain of the fabric. In that case you can also pull the corners of the fabric until the thread breaks; good tension should lead to each thread breaking and in roughly the same place. If only one thread breaks then it is too tight relative to the other. My tension sits at 4, which works well and is the setting my sewing machine mechanic told me is right for my machine. According to this test, though, that’s still too high! Before the breakage test you can see 9 (actually, I think it was 8 and I wrote the wrong number) is too high – the fabric wants to cup.
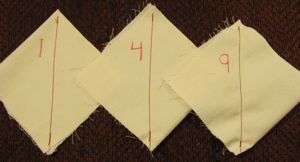
bias swatches

Then I gave them each a yank; the 1 broke only on the back and the other two only on the front.
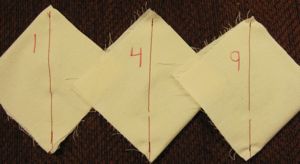
after snapping, front after snapping, back

Incidentally, I found a page on sewing machine tension that said to adjust your tension only when the presser foot is down, which was echoed by a couple of commenters who said otherwise you will completely wreck up your machine. I have never heard of this in my life, and I have worked in a costume shop and an alteration shop, and discussed tension with a sewing machine mechanic. I did find it mentioned casually in one of my sewing books, but not in my sewing machine manual or this New Mexico State University guide to sewing machine maintenance.

Now, for 90% of projects, you don’t need to touch the tension (mine runs 0 to 9 and I leave it at 4). There are some exceptions.

You may want to decrease the tension if

  • You’re working on delicate fabric that puckers easily.
  • You’re making a zigzag stitch and the fabric is scrunching.
  • You’re using a twin needle to sew and are getting skipped stitches.

I do not know any circumstances under which higher tension is desirable, except perhaps to intentionally scrunch the fabric up.
Alterations!

Tonight I teach my third class at the Sew-Op, and the second that is of my own design. It is a basic course on clothing alterations. The idea is to talk a bit about how clothes go together and about the most common alterations, as well as any tips and tricks I can pass on, and then let the class be guided by the particular interests and needs of the participants. I have a handout that should contain more information than we’re able to really go through in a two-hour class, so they have a reference for future use.

As part of the preparation I also posted a new page, which has been in the works for some time now. You can see it above as “Sewing Tidbits.” It is a sort of glossary, including links to other places with useful information. While the alterations class was the motivation for finishing it, there are non-alteration entries as well.

Looking through my small library of sewing books, it turned out only two were really good for alterations to existing clothes rather than to clothes you are sewing from scratch. One is so out of print Amazon doesn’t even have a front cover image for it: The Complete Book of Sewing, new revised edition with over 750 explanatory pictures, by Constance Talbot, 1943. [I am of the opinion that the best sewing books are from the 40s, 50s, and 60s, after electric sewing machines and mass production were well-established, but while people still made a lot of their own clothing.] Ms. Talbot has an entire section devoted to remaking and remodeling – changing the features of clothing either to eliminate worn parts or update its style. The other book that is good, which is probably not a surprise, is The Costume Technician’s Handbook, by Rosemary Ingram and Liz Covey, 1992 (the link is to a newer edition). This was one of the two textbooks for my Introduction to Costuming class in college, and since theaters often have to contend with low budgets, they have to make costumes work as many times as possible. This book has a thorough section on alterations with many, many pictures. Some of the alteration suggestions aren’t great for personal clothing, because in live theater you know the audience is at least a few feet away at all times so the fine details aren’t as key, but many of them are.

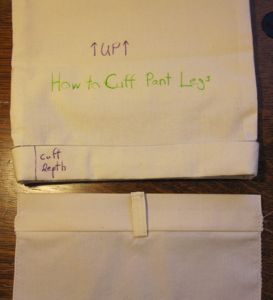
I have some show and tell pieces (“manipulatives,” they would be called in education): some children’s clothes I picked up at the thrift store, a partial pant leg to demonstrate how cuffs go together, and a partial waistband. The cuff and waistband are partially stitched but go together the rest of the way with velcro, so you can undo and redo them.

cuff and waistband

I’ll share some of the other parts of the class, and things I learned or wrote up while creating the sewing tidbits page, here over the next few posts. Please feel free to ask questions and make requests!

Peacock badges

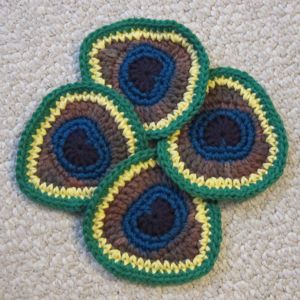
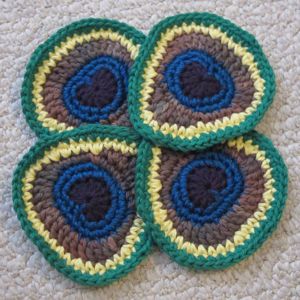
My mother asked for crocheted potholders for Christmas, and I thought since she likes bright colors (especially teal) that I would see about making her something peacock-ish. Well, I developed a pattern, which I like, but the result is leaving me cold. Since they are supposed to be for potholders I don’t want to use acrylic, and natural fibers are hard to find in sufficiently vivid colors. Anyway, I’m going to put up the pictures of the two arrangements I considered for the potholders and ask for suggestions. Perhaps if they were used individually as coasters it wouldn’t matter if some of the yarn was acrylic (actually, the blue yarn is 75% acrylic, 25% wool; the rest of them are 100% cotton), though you’d still want most of it to be natural, for absorbance.

Anyway, without further ado…

configuration 1 configuration 2

Edit: Since I posted the pattern in a comment, I thought I would post a cleaned-up version here that abides by my pattern conventions. I noted that the coasters tend to cup a little at the edge, and adding a few extra sc in the outermost round might be a good idea.

Second Edit (Oct 2013): I don’t know what happened here (except that I never intended this to be a shared pattern and was therefore not careful), and have fixed the myriad pattern errors that became apparent to me on re-reading. I’ve also created a name-your-price pdf version for the store, which includes photos of round by round progress and where to attach the new yarns. If you like this pattern, would you consider supporting me with a dollar or more via that pdf?

Other notes:
Recall that my pattern conventions include using 2sc for “sc twice in next st” and sc 5 for “sc once in each of next 5 sts.”
The top teardrop that belongs to a stitch is slightly to its right for a right-hander, and slightly to its left for a left-hander.
“Bottom” means when the coaster is oriented so the purple round forms a heart.
The sl st at the end of any non-purple round may be replaced with a needle join.
My notes say I made these with an F hook (3.75mm), but nowadays I would need an E hook (3.5mm), if not smaller, to have this tension.

Purple:
Form magic ring, ch 2; dc 10 in ring, ch 2, sl st into ring.
Cut yarn and pull end through last st; pass cut end through magic ring to back of piece.
Tighten ring most of the way but leave space for another stitch.

Teal 1:
Make sl kn and place on hk.
Insert hk into 7th purple dc, sl st, and ch 1.
Starting in the same st, *sc, 2sc* twice, sc into first ch of final purple ch-2, dc into magic ring, sc into second ch of starting purple ch-2, *2sc, sc* twice, 2sc twice.
Keep yarn attached!

As soon as you have made the dc you can finish tightening the magic ring and FO the purple yarn; I would do so before beginning the bronze yarn.

Teal 2:
Partial round (3 sts of Teal 1 will be unused).
Sl st into starting teal ch.
Starting in next st, 2sc, sc 2, 2sc, 2sc, sc 5, 2sc, 2sc, sc 2, 2sc, sl st.
Cut yarn and FO.
Between dc, sc, and sl st, you should have 26 sts around.

Bronze 1:
Place sl kn on hk; sl st to attach in last teal sc.
Starting in final teal sl st, sc 5, 2sc, [hdc, dc] in next st, *dc, 2dc* twice, dc 2, *2dc, dc* twice, [dc, hdc] in next st, sc 4.
Final sc will be in same st as joining sl st.
Keep yarn attached!

Bronze 2:
Partial round.
Starting in first bronze sc (sk the joining sl st), sl st, 2sc, [hdc, dc] in next st, [dc, hdc] in next st, 2sc, sl st.
Cut yarn and FO.
Counting the sl st, you should have 37 sts around.

Yellow:
Place sl kn on hk; sl st to attach in bronze st just to the right of the bottommost point of the bronze rnd (to the left if you are left-handed).
Ch 1.
Starting in same st, sc, 2sc, sc 2, *2sc, sc 4* six times, 2sc, sc 2. Sl st in first sc; cut yarn and FO.
You should have 45 sts around.

Green:
Place sl kn on hk; sl st to join in the center of any straight side [if you want specificity, start counting with the bottommost yellow st and join in the 9th st in the direction you work (left for righties, right for lefties)].
Ch 1.
Starting in the same st, *sc 4, 2sc, sc 2, 2sc, sc 2, 2sc, sc 4* three times.
Sl st and FO.