Quick back seat cup holders

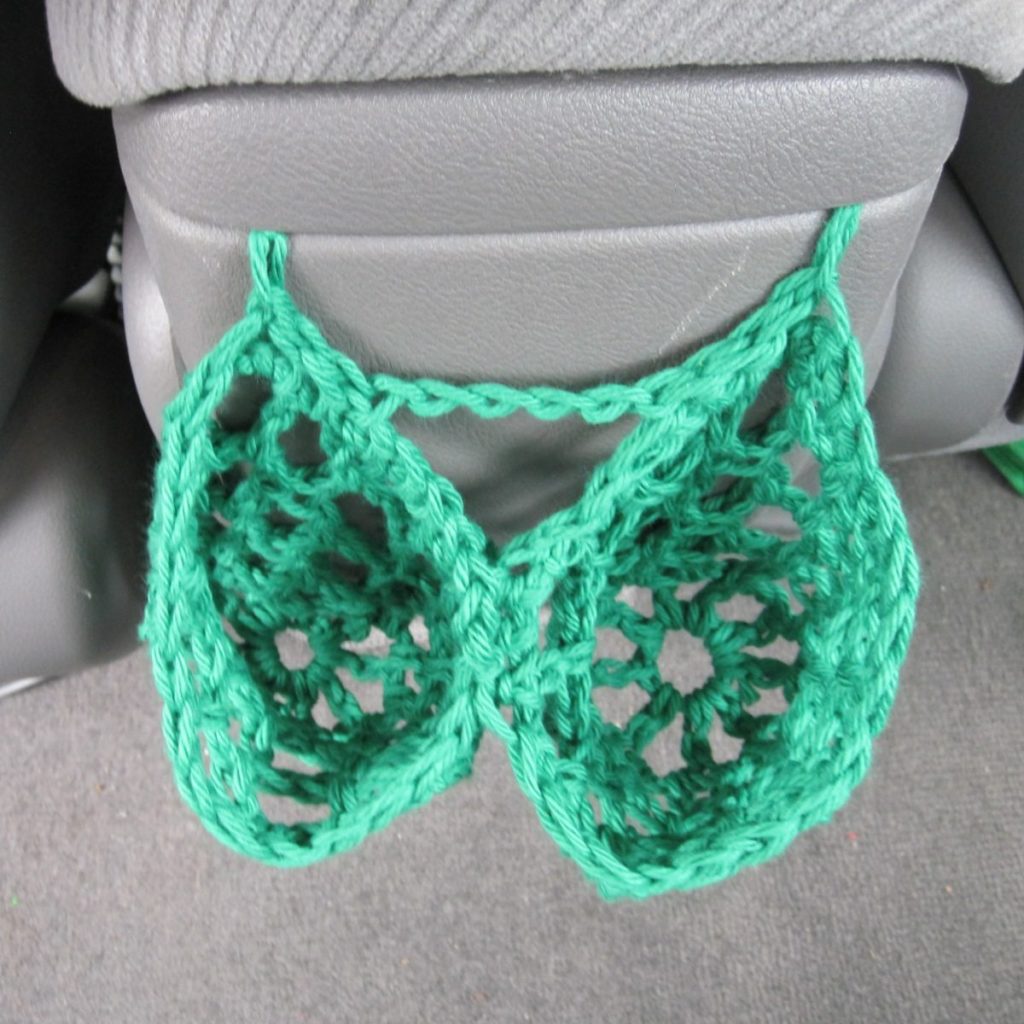
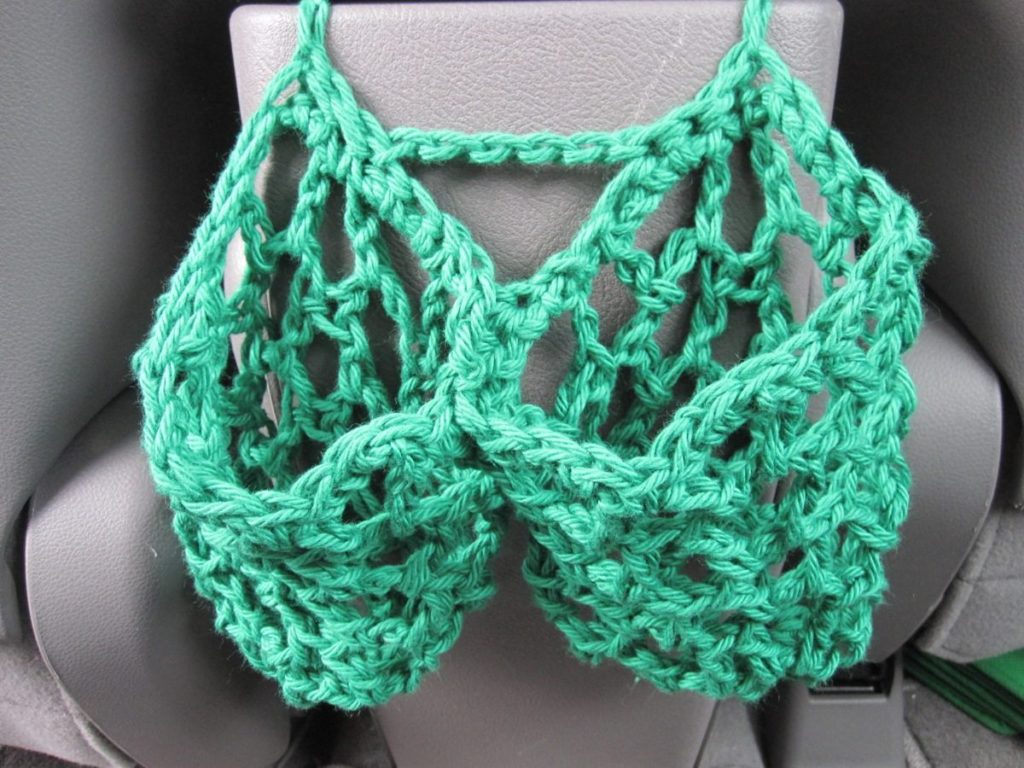
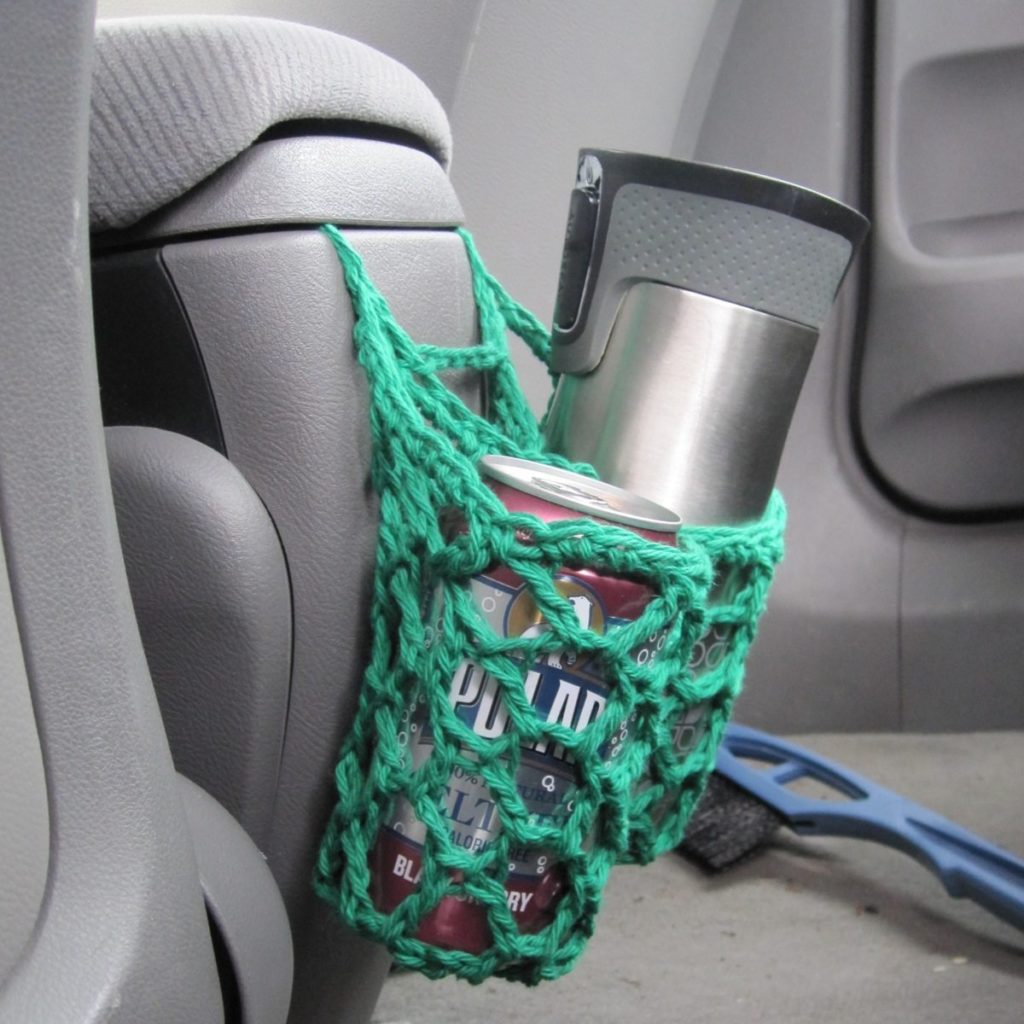
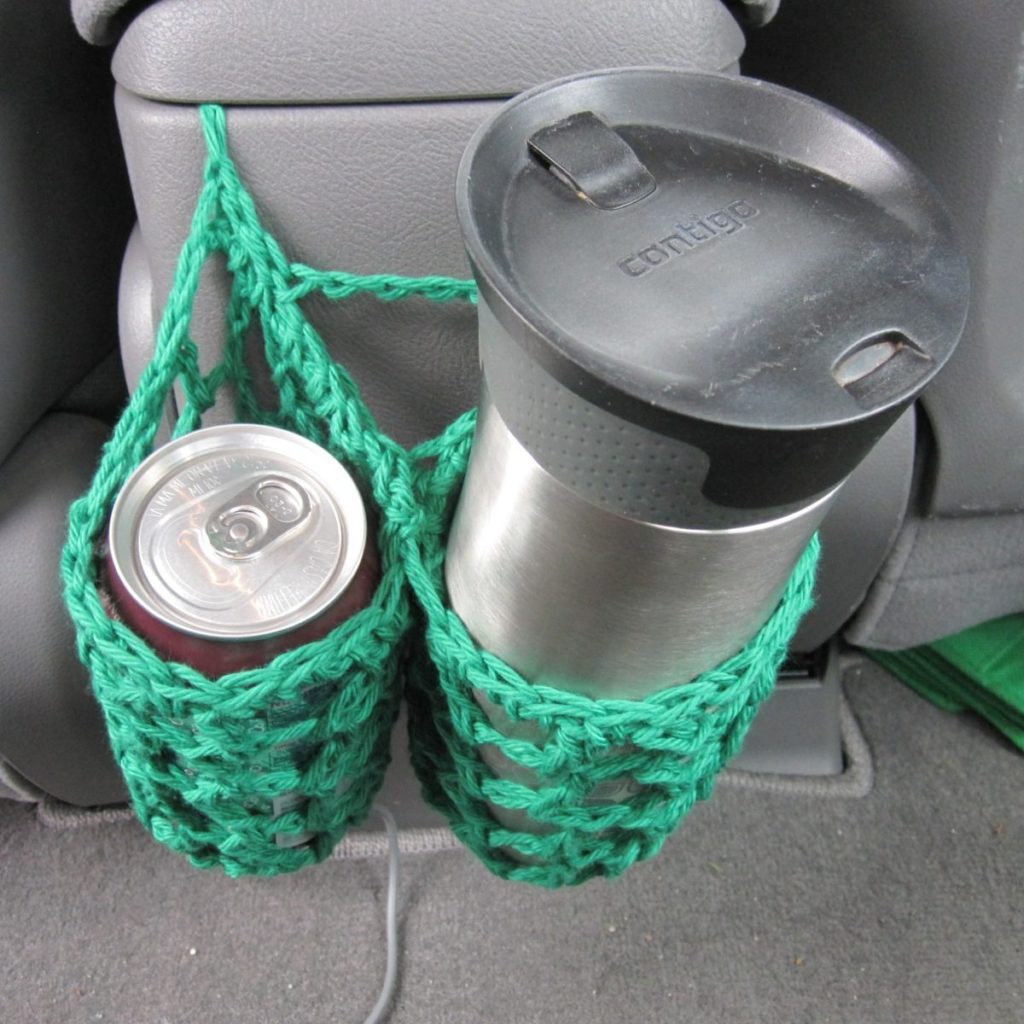
My car is comfortable, reliable, and pretty efficient, but it lacks certain creature comforts. I’d been meaning to fix one of those lacks: there are no cup holders for the back seat. The front center “armrest” is the top of a cubby, hinged on its back end, and I pictured something like macrame plant hangers but on a cord that would tie around the hinge. Last week we drove the 90 minutes to my mother-in-law’s place and on the way I made these:

cup holder from side cup holder head down

The pattern is easy to find in my notebook because my pen globbed up and then I got it on my hands and now, well, all the local pages are ink-stained.

Backseat Cupholders
I made these with a J/10 hook (6mm) and worsted weight cotton yarn.
Make two:

  1. Chain 6, sl st into ring.
  2. Ch 5 (counts as dc + ch-2), *dc into ring, ch 2* 8 times, sl st in 3rd turning ch to join (9 dc, 9 ch-2 spaces).
  3. Ch 3, dc in 2nd ch sp; ch 3, dc in same ch sp and next ch sp; ch 3, dc in same ch sp, sk 1 ch sp and dc in next; ch 3, dc in same ch sp, sk 1 ch sp and dc in next; ch 3, dc in same ch sp and next ch sp; ch 3, dc in same ch sp, dc in rnd-1 sl st; ch 3, dc in 3rd turning ch to join (12 dc, 6 ch-3 spaces). [This is much easier to follow in diagram form; see below.]
  4. Ch 3, *[dc, ch 3, dc] in next ch sp* 5 times, dc in next ch sp, ch 3, sl st in 3rd turning ch (12 dc, 6 ch-3 spaces).
  5. Repeat round 4.
  6. Repeat round 4.
  7. Ch 1, sc between each dc pair and 3 times in each ch-3 space (24 sc).

On first pocket, slip stitch or needle join in first sc of round to join and finish off yarn. On second pocket, use the yarn to join the cupholders together: place the first in front of the second so their outsides touch, and stitch into loops of round-6 stitches of both simultaneously. Sc 3, sl st, FO.

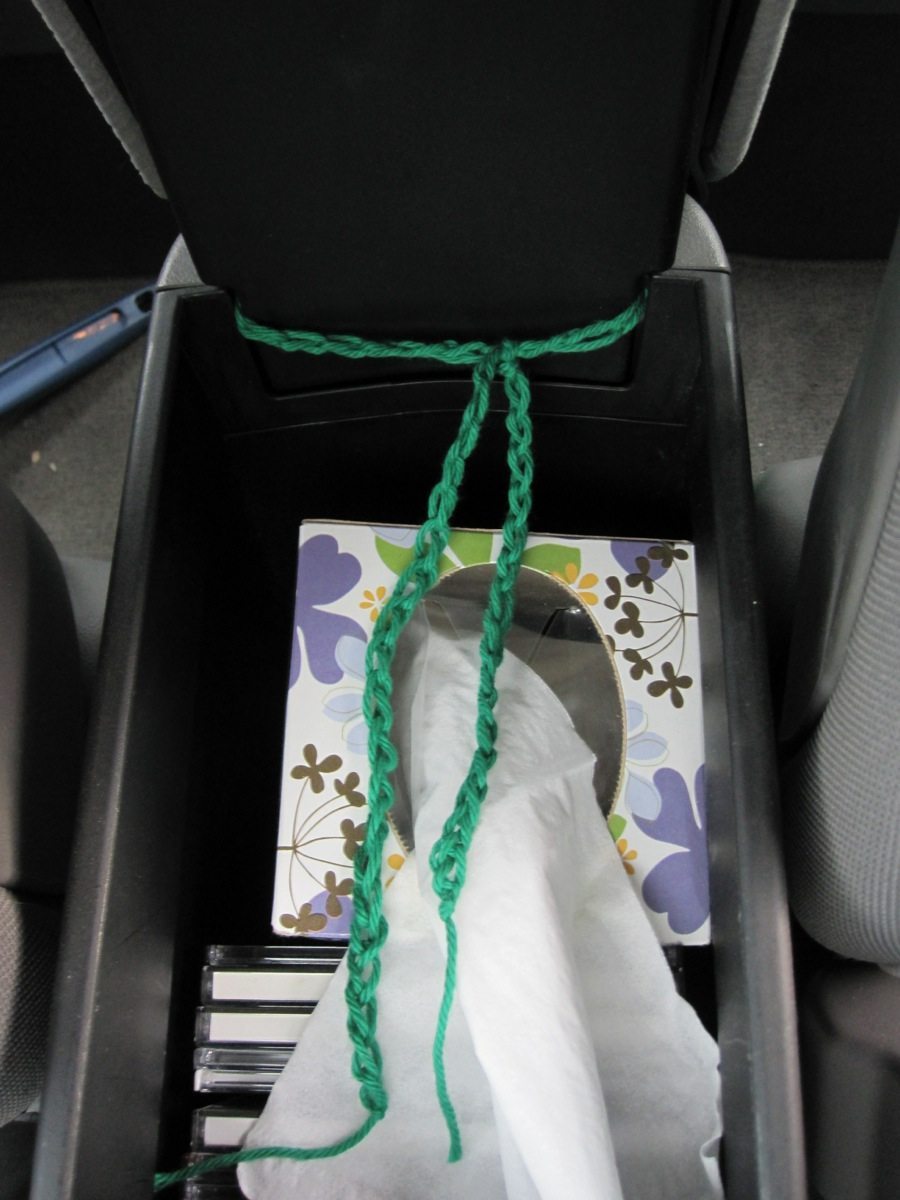
For the hanging cord, I did this:
Ch 30. Flatten cup holders so joined part is in the middle. Sl st into middle 4 stitches of back of right-hand cupholder (left if you crochet left handed), ch 5, sl st into middle 4 stitches of back of remaining cupholder. Ch 30, cut yarn and tie a knot. You’ll work outside to inside on the first pocket and inside to outside on the second. Ch-30 on each end was longer than needed, though, and even ch-20 should be adequate.

cup holder ties

Behold my first crochet diagram for public consumption, rounds 1-3 of the pattern:
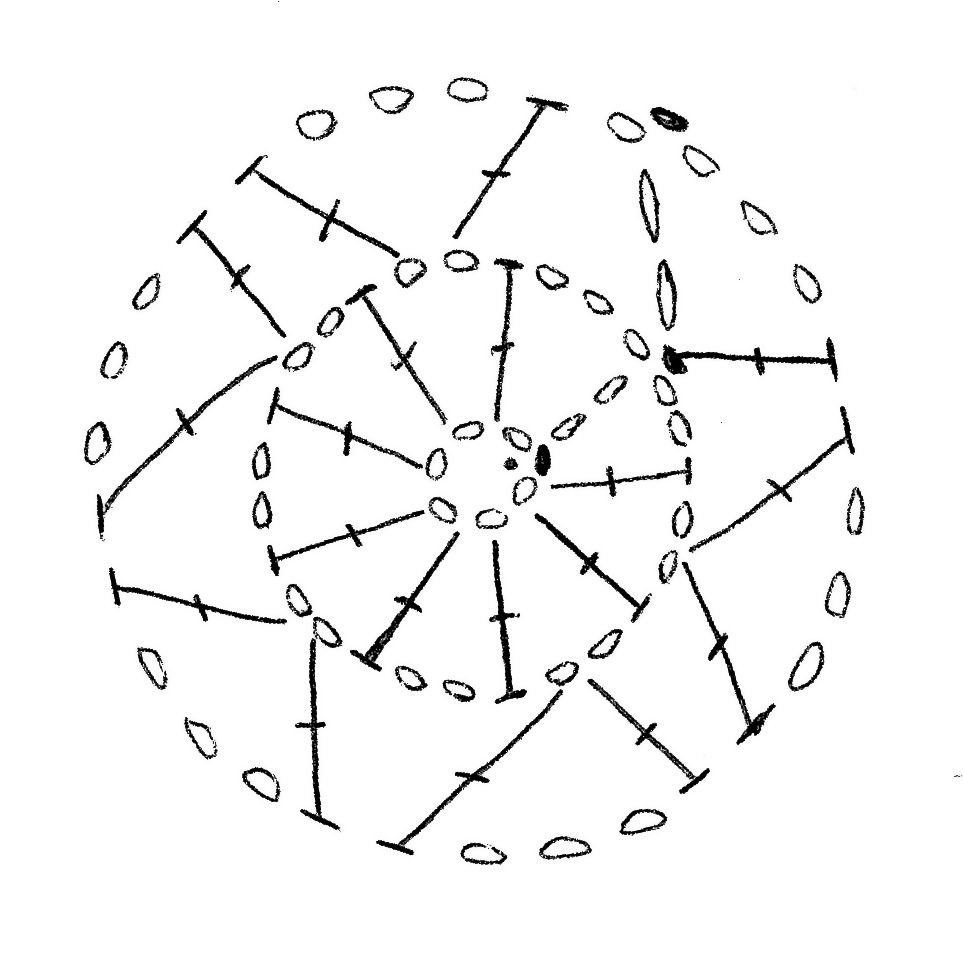
cupholder diagram rounds 1-3

Dot = slip knot
Open oval = chain
Solid oval = slip stitch
Capped line with cross = double crochet

And a few more pictures.

cup holder empty cup holder flattened

The Vault: Part 5

My fox experience led to playing around with color change, seeing what happens when you change color in some rotation. I had to play again to reconstruct what happened in the photo below, but it was fun to do.

old color experiments

This is all in single crochet, of course, the center of my crochet universe. The picture above is of a piece rather unhelpfully made partly in variegated yarn; I tried to give more visual information when I recreated it. Working from the bottom up in the picture below, starting and ending with two rounds of single-color stitching and with a round of single-color in between each of the following, is a single round of alternating loops of each of two colors, another single round but with the position of the colors swapped, paired rounds of each of those situations, and finally a single and then three rounds of three colors in rotation, one loop in each at a time. In the single round of three-color work I pulled loops in the order blue, yellow, red. In the second I pulled blue, red, yellow; there are three rounds instead of two because when I started round 2 I realized that I was pulling a loop of red through a red stitch-top, and likewise for the other colors, so at the end of that round I inserted an additional loop of blue and made a round where the colors did not match.

new color experiments

This work is somewhat less elastic than crochet usually is, but not terribly so (you do have to make sure not to pull your yarn tight, as with any color work). If you like the look of duplicate stitch embroidery on knitting, this is probably the easiest way to get it in crochet – it’s not an exact match, but I’m not sure such a thing is possible, and you don’t have to do any embroidering!

To be continued…

Last-minute scarf

I promised a scarf to a friend for her daughter, and sat down to start it. To my surprise, in less than an hour and 45 minutes the crocheting was done and I just had to add fringe!

last minute scarf

There it is with the fringe. This is a scarf in half double crochet, each row stitched in the bottom loop of the “faux teardrop” on the back of the previous row. I got the idea from Jenn Ozkan, but clearly from the pictures I used a larger hook for the yarn than she did: K/10.5 (6.5mm) for Red Heart With Love, a plush worsted at the thickest end of the weight class. I wanted the scarf to be soft and smooshy.

I started with a row of foundation hdc that was about 54″ long (though you could certainly use a starting chain instead), and stitched 9 rows total:
2 black
pink, black, pink, black, pink
2 black
The scarf is about 5″ wide. A skein of RH With Love is 7 oz/370 yds (198 g/338 m), and I used about three-quarters of a skein total: just over 3 oz (160 yds; 85 g/146 m) of black and just under 1.5 oz (80 yds; 43 g/73 m) of pink. Over half an ounce of black and about a quarter ounce of pink went to the fringe.

It wasn’t really practical to carry my yarn between stripes, because I was always starting colors at the opposite end of the scarf than I had finished them previously. Instead, at the beginning and end of each length of yarn I left a long tail to incorporate into the fringe. If you want to try out foundation half double crochet for the first time this isn’t a bad choice of project for it. There’s a great tutorial for foundation sc on futuregirl’s blog, and the modifications for hdc are minimal: still a ch-2 to start, a yarn wrap before each hook insertion, and pulling through 3 loops on the hook where in sc you’d pull through 2. Fuller instructions at the bottom of the post, but meanwhile fringe!

fringecloseup

The recipient of the scarf has three younger siblings, the youngest of whom is still a baby. I wanted to put fringe on the scarf in such a way that picking it out would be laborious. My solution was to put the ends of any given length of yarn in two different tassels. I should probably tell you adding fringe took about as long as the crocheting, but if you did it a more simple way (either feeding a bundle of yarn through and tying it in an overhand knot, or attaching a bundle of yarn with a lark’s head knot) it would be a lot quicker. I cut two-foot lengths of yarn, 11 pink and 21 black for each side. Most, if not all, of the strands are in tassels no more than 3 apart. In between I tried to corkscrew them around – and sometimes not having messy strands meant getting the tassel strands around the outside of the lengths stretching between tassels. I did all the pink first so the black would cover it over a bit between tassels. The pictures below show the loose ends from crocheting, most of the pink strands woven in, and the fringe finished but not yet trimmed. I have a note to myself that indicates I believed I took pictures when 4 tassels had been knotted and the rest were awaiting the rest of the black yarn, but apparently that was only a hallucination.

unfringed scarf partly fringed scarf uncut fringe

Most of the 10 tassels on each end have 7 strands of yarn, but one has 8 since there was an odd number of strands left from crocheting. They are 2 pink and 5 black, 3 pink and 4 black, and one 3 pink and 5 black. I tried to have more pink on the outside tassels and less on the inside ones. I trimmed the fringe by eye, and the reason it looks shaggy is that I did so before washing the scarf. The scarf is fully machine washable and dryable (in acrylic yarn, and in a mesh bag to avoid snags) but the fringe will get split ends, so don’t trim until afterward (and hand wash/line dry if that will bother you).


Foundation Half Double Crochet:
1. Chain 2; yarn over, insert hook into first chain and pull up a loop. Pull it up a little higher than you would normally.
2. Yarn over and pull through first loop on hook (essentially, chain 1).
3. Yarn over and pull through all 3 loops on hook. [One foundation half double crochet, fhdc, made.]
4. Yarn over, insert hook into chain made in step 2 and pull up a loop. Again, a little higher than you would normally.

Repeat from step 2 as many times as desired, but stop after step 3 of the last hdc. Basically, step 1/4 creates a location to stitch into, and steps 2 and 3 are a half double crochet made in that spot. My note about pulling the loop in step 1/4 up higher than you would normally is because foundation stitches are supposed to be true to width, but if I do not make sure to pull that loop up tall I get a tight edge (a fhdc strip that curls downward) exactly as I do if I use a starting chain without doing something about my natural chain tension.