I’m setting out to systematically explore shaping in crochet, at least as it pertains to amigurumi: fairly small hooks for the yarn and single crochet almost exclusively. The first installment is the effect of quantity of increases made when working in the round.
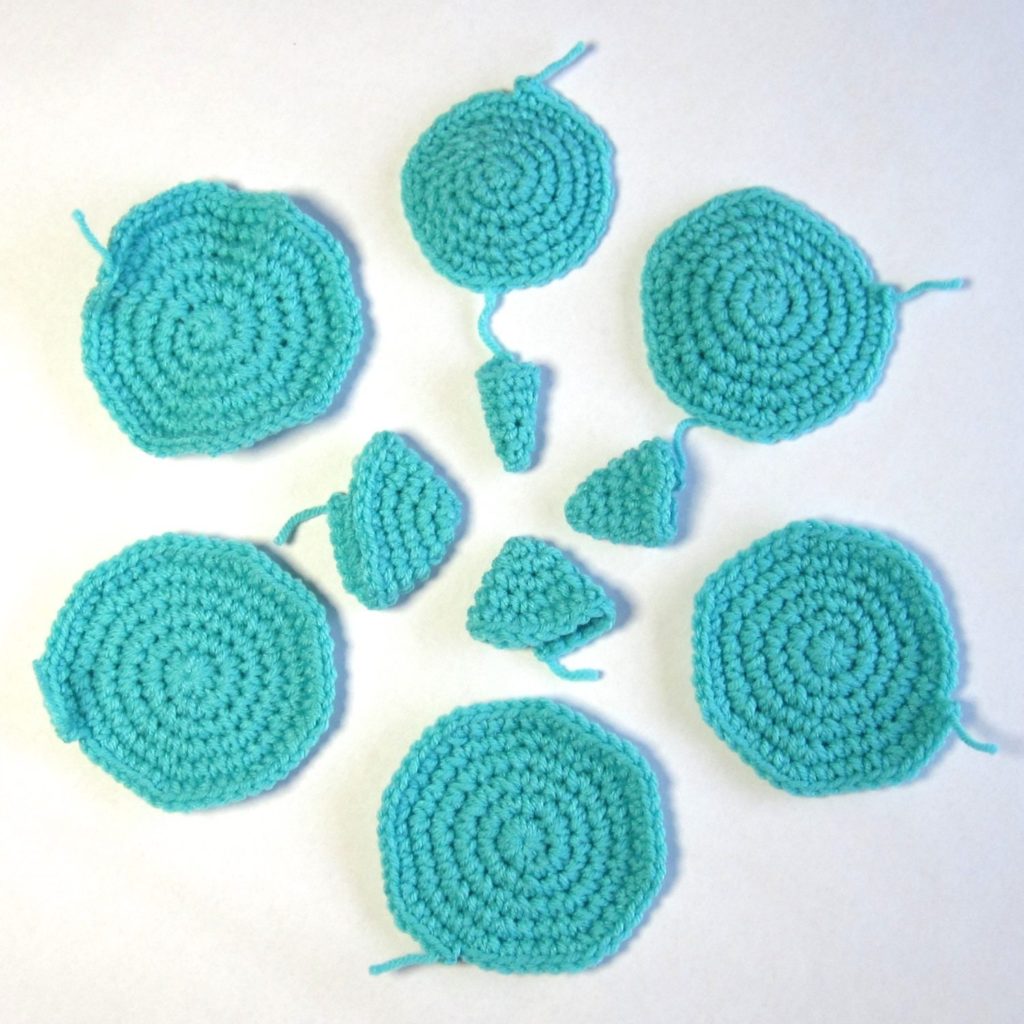
The samples were worked for six rounds, and were increased by the same number of stitches in each round. They are in order by number of increases, from the top of each ring around clockwise, 1-4 in the inner ring and 5-10 in the outer. The 1-increase sample was begun with 3 sc in a magic ring and the 2-increase sample was begun with 4 sc in a magic ring; otherwise the beginning number was equal to the number of increases per round. In every case the increases were evenly spaced and the first was in the first stitch of the round.
You can see that increasing by 1 to 4 stitches per round produces a cone (I posted a lot more about cones last winter). As of 5, though, it shifts to a cupped shape. 6 is also somewhat cupped, but 7 is flat. 8 is also flat and not terribly crowded. 9 starts to get crowded and want to ruffle, but real ruffling doesn’t kick in until 10, which refuses to lie flat. Since I used worsted weight yarn with an F/5 hook (3.75mm) the ruffles are rather stiff, but with a larger hook for your yarn they would be soft and malleable. It could be a nice effect for the edge of a doily.
Increasing by six stitches per round is used for both flat disks and cupped ends; the recipe I learned long ago for making a sphere is to increase by six stitches per round until it’s as broad as you want, sc even for some suitable number of rounds, and then decrease by six stitches per round to close off. I wonder looking at these samples whether 5 increases would also make a good sphere (you won’t have to wait too long for that – two sphere samples are already done, though not this one yet). For me, 7 increases per round is a more reliable disk.
Math sidetrack: why 6 and 7? Because of pi. Or tau, I suppose. To be flat, a one-unit increase in the radius of the disk (i.e., an additional round) must be accompanied by a 2π-unit increase in the circumference. If single crochet stitches added exactly the same amount to the circumference as to the radius, you would need 2π additional stitches per round (which would work out pretty well to 7 every fourth round and 6 otherwise). However, for me at least, they add less to the circumference than to the radius, so I need a skosh more. How much of this is due to them being squished together at the base and how much to my particular stitch gauge I can’t say, although it is certainly possible that 7 is overkill for you and your 6 is perfectly flat, or that with a different hook:yarn size ratio I myself might want 6 or even 8.
One last note: You can see slight corners on some of these pieces, and in person they all have a bit of cornering. This is due to stacking the increases on top of each other round to round. An increase produces a slight bump out (more on this in another shaping post as well) and that’s been allowed to shine through. The easiest fix is simply to offset the increases in every other round. When the number of non-increase stitches between increases is odd, begin the round with an increase. When it is even, begin the round with half that number of stitches and then do the first increase. You’ll end the round by making the same number of non-increase stitches as you began with.